
The idea of hosting a website is a pretty simple idea. You make the website, you get the domain name, you hook everything together and boom, you have a little spot on the web just for you.
Well in practice it's a little more complicated. Where are you gonna buy the domain name? Where is your code going to live? Ok, you know where your code is going to live, but what about your images or static content? Videos? There are way more questions involved than you'd think.
So that's why I am writing this article, 1.) to teach you all and 2.) so I can friggin remember how to do this the next time I make a website. In my case I write a lot of python code and so this article will cover writing a simple flask application that is then hosted on Heroku (my personal favorite) with connections to Amazon S3 buckets for image uploads (Ex: this blog!).
There is a lot of terminology to cover and it can get confusing quickly so we'll try to take things one step at a time.
Step 1: Write your Flask/ Python Application
Obviously the first step in hosting a website is having the actual code for building the app (no duh). One thing to consider when building an application is to understand how your code will be structured from local development work (on your laptop) to staging (the place where you deploy your code first to see if there are any initial bugs before going to prod), and then production.
For simple enough flask applications I recommend reviewing the Factory Design Pattern for development. If you've never heard of design patterns, they are your friend. Design patterns are time-tested architectural designs that are built with a specific purpose in mind. In particular for flask applications the Factory Design Pattern allows you to delineate between local development configurations, staging configurations, and production configurations.
Flask applications are Python classes (Ever noticed how most tutorials start with app = Flask()? It's assigning the app variable to the Flask class and so the Factory Design pattern uses Python's Object Oriented nature to it's advantage by creating a "factory" that either creates a dev, staging, or production application depending on certain variables (typically stored in your .env file).
For example: When you run your application locally you might use a simple SQLite database that is spun up on the spot just for making sure the application works, but when you push that code to staging, its going to fail. In staging your app is going to need to connect to a database that is located somewhere in the cloud. By having the factory design pattern you can update the configuration values in say the .env file of your app to point to either "Development (SQLite DB, Staging (Heroku Hosted Postgres DB), or Production (Another Heroku Postgres DB)" and then whenever it is run in one of those three locations, it knows what DB configuration, where the images will be uploaded, etc.
Thinking about how your app will work in production at the beginning of designing your application will make a huge difference when you go to deploy to an online service, rather than needing to make a million re-writes after you feel like you've done all the work. Trust me, I've done it, it sucks. Think about it first.
Web Serving (What the hell is WSGI?)
One thing that I feel no one ever mentions in tutorials is what the hell a WSGI (Web Server Gateway Interface) is and why you need to think about them (or at least be aware they exist).
Most tutorials I read get you to the point where they run the python flask app locally and are like "Congrats! You have a running web application!" Not really? Yeah you are running it on your local machine, but that isn't how you serve it to your audience. That is where WSGIs and Web Servers come into play. Knowing that you will have to deal with these in staging/ production is important.
So anyways, now that I've ranted, when you want to actually host your wonderful app to your audience or customers, they are going to go to your website, and then what will happen are a myriad of requests to what is called a Web Server. The web server's whole job is to listen for these requests and then return the relevant information to the user.
The thing is that Web Servers themselves don't run Python code (don't ask me why, that's a larger topic) but what very smart developers in the Python community have done are created these callable Python objects called "Web Server Gateway Interfaces (WSGIs)" that essentially translate Web Server speak into Python speak so that the application will do what the Web Server requests of it.
Look at it like this:
Client (Someone's Browser) <-> Web Server/ Reverse Proxy (NGINX) <-> WSGI: Ex: Gunicorn <-> Your Flask Application's Source Code
Someone makes a request, the request goes to something like NGINX which is a web server or reverse proxy, this web server then makes a call to Gunicorn (WSGI) which is hooked into your application (Flask app) which is WSGI compliant. These multiple translations result in the code returning to the user in the form of a web application (HTML, CSS, JS, etc.)
Quick Note on NGINX: For those of you who can't move on without knowing the purpose of some small piece of information, NGINX is very commonly used with web applications (Instagram apparently uses it) and is highly recommended for these types of applications. But NGINX is a very versatile piece of software. It can act as a Reverse Proxy, a load balancer, etc. For applications that scale dramatically (thousands and thousands of users) NGINX does an excellent job forwarding requests to appropriate servers and then forwarding the correct information back to users.
Long story short, when you are finished writing your Flask application you will need to install something like Gunicorn (My recommendation) as a python package and use that to host your web application.
Below is an example of a "wsgi.py" module:
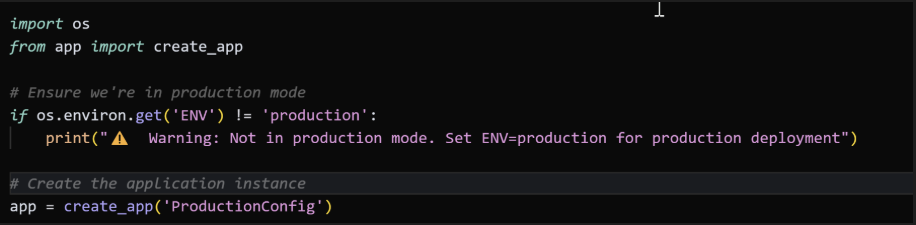
In this module the code is pulling a function called "create_app()" from the app package. This follows in the Factory design pattern as it allows us to create an application with different configurations depending on the value of the "ENV" variable within the .env file of the application.
Anyways, it pulls this in and creates a full flask app called "app" which when run, will render the production version of this application. If we passed "DevConfig" to create_app() then it would create a Development version of the application.
Then when we want to run the production config we can run a command like the following:
gunicorn wsgi:app
What is this doing?
- It is instructing gunicorn to hook into the wsgi module, and then run the app variable (aka our application)
- Given the wsgi module above, we can see it will run with the production config.
We will revisit this later with hosting on Heroku as you will encapsulate this gunicorn command into what is called a Procfile (what Heroku reads in order to run your application).
Here are some other helpful links on some of the topics mentioned above:
Gunicorn (WSGI):
- https://gunicorn.org/#deployment
- https://www.fullstackpython.com/green-unicorn-gunicorn.html
- https://flask.palletsprojects.com/en/stable/deploying/gunicorn/
NGINX (Web Server/ Reverse Proxy):
Hosting on Heroku
Ok so once you've written your Python/ Flask application and want to share it with the world, you are going to need to find someone to host it. Essentially this means "Where your code will live."
Now personally I like Heroku. I used to run my own business and used it back when I was a baby programmer. It was easy to use, has a lot of simple options, and lets you set up pipelines so you can see your app move from dev -> staging -> production. (Note I am not getting paid for any recommendations I make here. I just find it easy/ affordable).
Why I also like Heroku is because I love that they have simple add-ons for web applications. You can purchase access to a Heroku hosted DB (Postgres) for 0.007 cents an hour. Depending on the size of your application your may need more, but this is all for beginners. I'd just recommend doing the simple thing first, and then getting fancier as you move on and learn more.
Anyways, what you can do with Heroku is sign up, put in your payment information, and then you can hook up your application via GitHub. What's nice about this is in the future and as you push changes to your GitHub account, you can opt to have it automatically deploy your app to production or staging. It makes the whole development process quick and easy.
Heroku Terminology to Understand
So when you deploy your application to Heroku, essentially what happens is Heroku takes all of your code, wraps it all together and places it in a "containerized environment." For those who may be more experienced in development this essentially means it puts each instance of your application into a Docker container and hosts it on a server somewhere.
The dyno (one instance of your containerized app) is ran in this container with low level permissions and access to an ephemeral (temporary) filesystem.
Dynos are the building blocks of running an application on Heroku.
When running an app, Heroku only needs three things:
1. Source code (easily hooked into Heroku via Github)
2. A Procfile (This is where your Gunicorn config will live)
3. A list of Dependencies (Heroku will automatically read either a requirements.txt file or a Pipfile for those of you who use virtualenvs)
When all of these pieces of information are combined a slug is made. A slug contains everything needed to run the app except the operating system.
Heroku starts the app by deploying the slug to a dyno (or multiple dynos) and invoking a command in the Procfile (in our case, a gunicorn deploy command).
Heroku is a **polyglot platform** which is nice as it means it provides support for 8 different programming languages and can dynamically determine what is needed for each of these languages.
We won't talk about buildpacks but if you want to use another language they have those for support other languages they don't natively support.
Once the slug is created it is then provisioned an OS (called "the stack") which is curated and maintained by Heroku. The stack is based on Ubuntu, and open source Linux distribution. (https://www.heroku.com/dynos/build/)
if you want to learn more about how Heroku deploys code, take a look at the articles below:
Dynos:
Using Amazon S3 with your Application
Ok so everything I said so far is sweet and all but for some applications, we are going to want to be able to allow users to interact with the site or add content in some way. In Heroku, the filesystem is ephemeral and if you try to store new images in the dyno itself, it will auto-delete the uploaded files over time as that is not the purpose of the Dynos. The Dyno will hold your source code as well as the static images that are needed to display the site to users, but for object storage you are going to need another solution. In comes Amazon S3.
Amazon S3 (S3 == Simple Storage Service) is an offering by AWS to store images and content. In our use case we are going to want to store all of our images/ videos that will be uploaded by users to S3. While the idea is simple, I know that when I first started using it I was so confused by all the jargon and vocab that came with it. So below are some terms you should get acquainted with to help clear up some later confusion.
1. Buckets: Buckets are where your content will be stored.
2. Bucket Policies: When you go about creating a bucket you have to configure rules for how the bucket will be accessed, who can access it, and what types of operations that can be performed on it. In this scenario all we want to do is allow our users to submit images that will then get uploaded to S3. We will go through these in-depth. Honestly they still confuse me a bit because there are so many options.
Other links to read: https://docs.aws.amazon.com/AmazonS3/latest/userguide/example-bucket-policies.html
3. Cross Origin Resource Sharing aka CORS: Hell yeah baby, we're talking security! CORS is a standard policy for content sharing across the web. When you have a website (your domain is your origin) and you want to be able to pull information from other places (aka other origins) it's important to configure this properly as it makes sure that only the people you want to access your content can use your content. For example, if I have a website with a bunch of images, hypothetically someone could use the S3 bucket URLs to host the images on their site (why someone would do that, IDK but it could cause your S3 costs to go up.)
4. Identity and Access Management (IAM): Part of what you will set up in Amazon is the S3 bucket, but you'll also need to jump into the IAM console to create a service account user. There are a lot of options so just know that it can be overwhelming to navigate the site.
OK so once you have created an S3 account and payment information you will then need to set up a couple things:
1. Create a bucket (the place where your content will be stored)
2. Change the permissions on the bucket to allow read/write access
3. Create a user in IAM that will be used to query the bucket for uploads and create an access key for calling the AWS API.
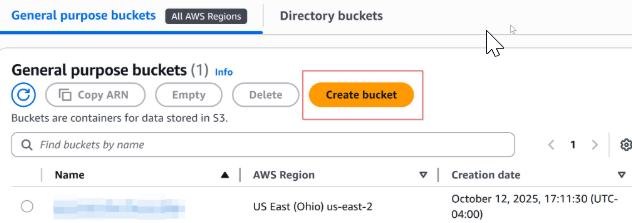
Creating a bucket:
- This is pretty straightforward.
- Find this button and go through the process of creating the bucket
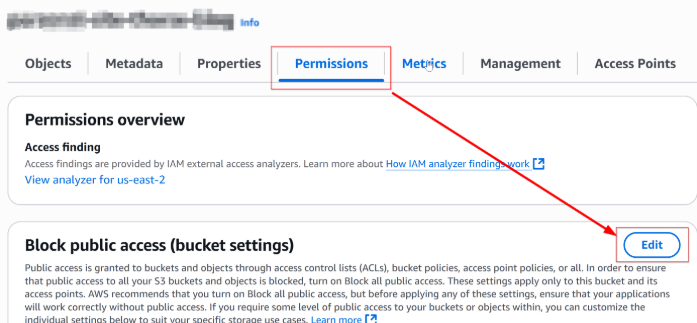
Then go to the permissions tab and edit the public access settings.
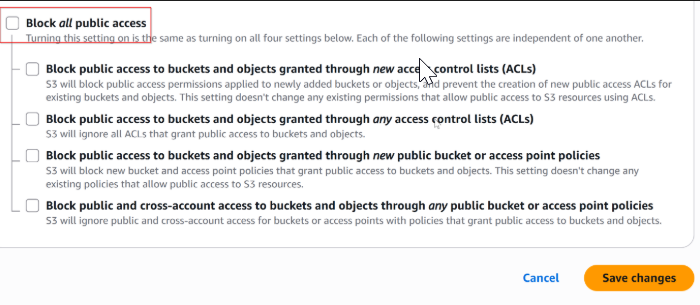
Deselect blocking all public access (it'll blow up with a bunch of warnings. For our use case we need to do this.) It'll look like below. Then hit "Save Changes."
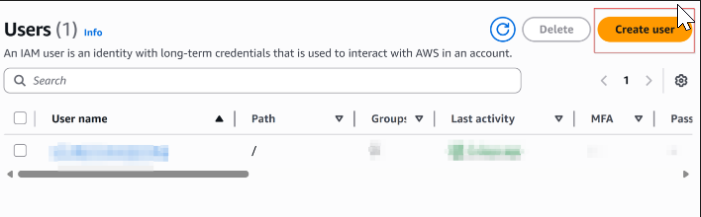
Once you do this you'll need to go to AWS IAM (Identity and Access Management) and create a user with an access key:
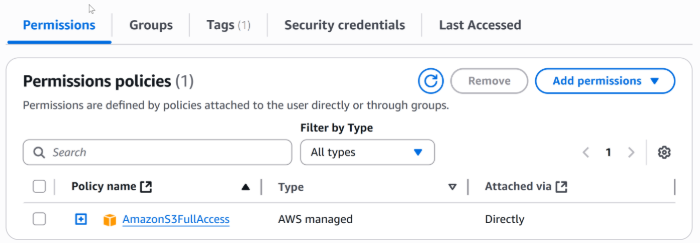
After creating the user you can add the AmazonS3FullAccess permission to this user as this account is going to be used as a service account (think of your application like a himan being who has a key to Amazon in order to do what it needs to do.)
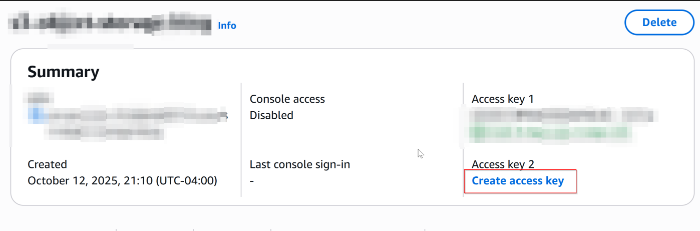
After this, find a button that says "create access key" and record the information that is provided. Keep this secure as anyone who has access to it can upload data to your S3 bucket (you don't want to be a horror story of someone who racked up thousands of dollars in fees because someone started using your account.)
Now you have everything you need in order to begin submitting requests via your application. I am not going to go into detail on how to make these calls because you likely have your own way that you will want to call a file upload feature (plus with AI and other tools, it should be easy enough to figure this all out.) I intend to come back and add more to this article or break up some of these comoonents into smaller chunks for people to read about. As I learn more I'll be sure to keep updating this site.
But thank you for reading! If you liked this article, that's great! I don't have likes or comments on this site so I will never know. But if you see me in person you should say something like "sick article that was dope as hell." Look out for the next article!